Tuesday, 7 April 2015

How to block Adblocker on your Blogger Blog


Adblocker Now a days annoying the Bloggers By Reducing there Ad revenue..So Today We are Giving a Script That Will force your visitors to disable AdBlocker,which will detect AdBlock and guide the user to disable if they want to continue to Browse our site, otherwise It Will Show White screen until or unless they disable AdBlocker
To Add This Code To Your Blog Just Click On Below Button :

Manual Install :

  • Sign in To Your Blogger Account and Select Blog That You Want To ADD This Widget
  • Go To Layout Tab And Select Add a Widget
  • Then select HTML/JavaScript And Paste Any One Of The Below Code Inside It
  • And Save It
<style>
#nbtabu {
    position: fixed !important;
    position: absolute;
    top: 0;
    top: expression((t=document.documentElement.scrollTop?document.documentElement.scrollTop:document.body.scrollTop)+"px");
    left: 0;
    width: 102%;
    height: 102%;
    background-color: #f9f9f9;
    font-style:normal;
    opacity: .97;
    display: block;
    padding: 10% 0;
}
#nbtabu * {
    text-align: center;
    margin: 0 auto;
    display: block;
    filter: none;
    font-style:normal;
    font-family: 'Yanone Kaffeesatz', sans-serif;
    text-decoration: none;
}
#nbtabu ~ * {
    display: none;
}
#nbtabu * a{
padding: 12px 15px!important;
  background-color: #f77c6a;
  color: #fff!important;
  font-weight: 700;
  font-size: 14px;
  font-family: 'Open Sans',sans-serif;
  text-align: center;
  text-transform: uppercase;
  letter-spacing: 0.5px;
  border-radius: 3px;
  display: block;
  margin: 15px auto;
  clear: both;
  width: 20%;
  transition: all 0.3s ease-out;
}
p{
    font-size:25px;
}
</style>
<div id="nbtabu">
<span>Please Enable JavaScript!<br />Please Enable Javascript!<a href="http://www.enable-javascript.com/">Enable JavaScript</a></span></div>
<script>
 WebFontConfig = {
    google: { families: [ 'Yanone+Kaffeesatz::latin' ] }
  };
  (function() {
    var wf = document.createElement('script');
    wf.src = ('https:' == document.location.protocol ? 'https' : 'http') +
      '://ajax.googleapis.com/ajax/libs/webfont/1/webfont.js';
    wf.type = 'text/javascript';
    wf.async = 'true';
    var s = document.getElementsByTagName('script')[0];
    s.parentNode.insertBefore(wf, s);
  })();
window.document.getElementById("nbtabu").parentNode.removeChild(window.document.getElementById("nbtabu"));
(function(l, m) {
    function n(a) {
        a && nbtabu.nextFunction()
    }
    var h = l.document,
        p = ["i", "s", "u"];
    n.prototype = {
        rand: function(a) {
            return Math.floor(Math.random() * a)
        },
        getElementBy: function(a, b) {
            return a ? h.getElementById(a) : h.getElementsByTagName(b)
        },
        getStyle: function(a) {
            var b = h.defaultView;
            return b && b.getComputedStyle ? b.getComputedStyle(a, null) : a.currentStyle
        },
        deferExecution: function(a) {
            setTimeout(a, 250)
        },
        insert: function(a, b) {
            var e = h.createElement("span"),
                d = h.body,
                c = d.childNodes.length,
                g = d.style,
                f = 0,
                k = 0;
if ("nbtabu" == b) {
                e.setAttribute("id", b);
                g.margin = g.padding = 0;
                g.height = "100%";
                for (c = this.rand(c); f < c; f++) 1 == d.childNodes[f].nodeType && (k = Math.max(k, parseFloat(this.getStyle(d.childNodes[f]).zIndex) || 0));
                k && (e.style.zIndex = k + 1);
                c++
            } e.innerHTML = a;
            d.insertBefore(e, d.childNodes[c - 1])
        },
        displayMessage: function(a) {
            var b = this;
            a = "abisuq".charAt(b.rand(5));
            b.insert("<" + a + '><center><p>We detected Adblock is active on your browser.<br>Please Turn off Adblock extension before browsing This Site</p><img src="https://blogger.googleusercontent.com/img/b/R29vZ2xl/AVvXsEgdgEDFrEmtJcIHf56OKeM3WGS1gXtTUAa-DrdrkjgzL_1QQ8KtVaCluLzco2-Q7F-j4Dfc1rXS0VK8gf55QjNTSa2eprc5fFYQRWUki7ntViHINCRVawM3p9nTic96Ja1ZRRJ7vuUfG00/s1600/Disable+Adblock.png"/><p>In order to keep this website free, this site is sponsored in part by advertisements.<br>Please consider disabling your ad blocker on this website if you enjoyed the content,and would like to support future informative posts.<br>Thank you!</p></center><a href="JavaScript:window.location.reload()">Reload</a>' + ("</" + a + ">"), "nbtabu");
            h.addEventListener && b.deferExecution(function() {
                b.getElementBy("nbtabu").addEventListener("DOMNodeRemoved", function() {
                    b.displayMessage()
                }, !1)
            })
        },
        i: function() {
            for (var a = "DivTopAd,ad-zone-1,ad_190x90,ads-sticky,iqadtile5,leftframeAD,tobsideAd,ad,ads,adsense".split(","), b = a.length, e = "", d = this, c = 0, g = "abisuq".charAt(d.rand(5)); c < b; c++) d.getElementBy(a[c]) || (e += "<" + g + ' id="' + a[c] + '"></' + g + ">");
            d.insert(e);
            d.deferExecution(function() {
                for (c = 0; c < b; c++)
                    if (null == d.getElementBy(a[c]).offsetParent || "none" == d.getStyle(d.getElementBy(a[c])).display) return d.displayMessage("#" + a[c] + "(" + c + ")");
                d.nextFunction()
            })
        },
        s: function() {
            var a = {
                    'pagead2.googlesyndic': 'google_ad_client',
                    'js.adscale.de/getads': 'adscale_slot_id',
                    'get.mirando.de/miran': 'adPlaceId'
                },
                b = this,
                e = b.getElementBy(0, "script"),
                d = e.length - 1,
                c, g, f, k;
            h.write = null;
            for (h.writeln = null; 0 <= d; --d)
                if (c = e[d].src.substr(7, 20), a[c] !== m) {
                    f = h.createElement("script");
                    f.type = "text/javascript";
                    f.src = e[d].src;
                    g = a[c];
                    l[g] = m;
                    f.onload = f.onreadystatechange = function() {
                        k = this;
                        l[g] !== m || k.readyState && "loaded" !== k.readyState && "complete" !== k.readyState || (l[g] = f.onload = f.onreadystatechange = null, e[0].parentNode.removeChild(f))
                    };
                    e[0].parentNode.insertBefore(f, e[0]);
                    b.deferExecution(function() {
                        if (l[g] === m) return b.displayMessage(f.src);
                        b.nextFunction()
                    });
                    return
                }
            b.nextFunction()
        },
        u: function() {
            var a = "ad&adv_keywords=,-page-peel/,/adchain.,/adfootright.,/adsxml/ad,/adyard300.,/impopup/ad,/loadadsparam.,/meme_ad.,_adshare.".split(","),
                b = this,
                e = b.getElementBy(0, "img"),
                d, c;
            e[0] !== m && e[0].src !== m && (d = new Image, d.onload = function() {
                c = this;
                c.onload = null;
                c.onerror = function() {
                    p = null;
                    b.displayMessage(c.src)
                };
                c.src = e[0].src + "#" + a.join("")
            }, d.src = e[0].src);
            b.deferExecution(function() {
                b.nextFunction()
            })
        },
        nextFunction: function() {
            var a = p[0];
            a !== m && (p.shift(), this[a]())
        }
    };
    l.nbtabu = nbtabu = new n;
    h.addEventListener ? l.addEventListener("load", n, !1) : l.attachEvent("onload", n)
})(window);
</script>


Monday, 6 April 2015

[UPDATED] How To Create a Social Content Locker in Blogger Blog


Update : Powered By New Blogger Tricks attribution is Removed..

Enjoy the New Version without any Credits 

Social Content Locker is Used To Lock Specific text  And Images
You Can Easily Install Social Content Locker By Following Simple Steps


  • Sign in To Your Blogger Account and Select Blog That You Want To ADD This Widget
  • Then Go To Template Tab  >>  Edit HTML
  • Then Add The Below Code Before or Above </head> (Want help to find Click Here)
<link href='http://newblogger-tricks.webege.com/locker.css' rel='stylesheet' type='text/css'/>


Update  New Design Added

            To See New Design ClickHere
  • For this design replace the above code with below code
<link href='http://newblogger-tricks.webege.com/locker-new.css' rel='stylesheet' type='text/css'/>


  • Now Go To The Post/Page you want to Lock Content And Add Below Code In HTML Tab

  • <article id="default-usage">
    <div class="to-lock" style="display: none;">
         
    <!--Hidden Content Starts (You can Use HTML BELOW)-->
    <div style="text-align: center; margin-bottom: 20px;">
    <img src="Add_Hidden_Image_Here" alt="" style="margin: auto;" />
    </div>
    <div style="text-align: justify">
    Add Your Hidden Text Here
    </div>
    <!--Hidden Content Ends (You can Use HTML ABOVE)-->
    </article>
    </div><div id="nbtunlocker"> </div>
    <script type="text/javascript" src="http://newbloggertricks.googlecode.com/svn/lock.js"></script>

    <script>
    jQuery(document).ready(function ($) {
    $("#default-usage .to-lock").socialLock({
    text: {
    header: "Share it To Unlock This Content",
    message: "Yes, this is Social Locker. Just try it, click on one of buttons."
    },
    style: "ui-social-locker-secrets",
    buttons: {
    order: ["twitter", "facebook", "google"]
    },
    // twitter options
    twitter: {
    url: "http://www.newblogger-tricks.com",
    text: "Upgrade your social buttons to get more social traffic!"
    },
    // facebook options
    facebook: {
    url: "http://www.facebook.com/newbloggertrcks",
    appId: "706100816073140"
    },
    google: {
    url: "http://www.newblogger-tricks.com"
    }
    });
    });;;;
         
    </script>


  • For Facebook: Replace http://www.facebook.com/newbloggertrcks  with your Facebook Page.
  • For Twitter: Replace http://www.newblogger-tricks.com with your Website's URL or etc. 
  • For Google+: Replace http://www.newblogger-tricks.com with the URL of your website or post.
  • Replace Add_Hidden_Image_Here with the Image that you want to Hide.
  • Replace "Add Your Hidden Text Here" With the text that you want to hide from users.


  • Remember: Don't forgot to Add Facebook App ID otherwise the Facebook Like button will not appear properly. i.e. Replace 706100816073140 from above coding.


    Tuesday, 6 May 2014

    Add Flat UI Labels Cloud To Blogger Blog

    Flat UI design refers to a style of interface design which removes any stylistic choices that give the illusion of three-dimensions (such as drop shadows, gradients, or textures)..So Today We Are Going To Describe You How To Add FLAT UI Labels Cloud To Your Blogger Blog

    Step 1 : Add The Css Code To Your Template
    • Go To Blogger >> Template >> Backup Your Template
    • Click Edit HTML >> Search For ]]></b:skin> (Want help to find Click Here)
    • Now Paste The Following code Above/Before ]]></b:skin>
    .sidebar .label-size {
    position:relative;
    text-transform: uppercase;
    text-decoration:none;
    font-size:13px;
    font-family:Open Sans;
    color:#fff!important;
    }
    .sidebar .label-size a {
    color:#fff!important;
    font-weight:400;
    padding:8px 10px;
    margin:0 6px 6px 0;
    float:left;
    display:block;
    -moz-transition: all 0.4s ;
    -o-transition: all 0.4s;
    -webkit-transition: all 0.4s ;
    -ms-transition: all 0.4s ;
    transition: all 0.4s ;
    }
    .sidebar .label-size-1 a {background:#1abc9c;border-bottom:3px solid #127F69;}
    .sidebar .label-size-1 a:hover {background:#16a085;}
    .sidebar .label-size-2 a {background:#3498db;border-bottom:3px solid #226693;}
    .sidebar .label-size-2 a:hover {background:#2980b9;}
    .sidebar .label-size-3 a {background:#2ecc71;border-bottom:3px solid #1F8C4C;}
    .sidebar .label-size-3 a:hover {background:#27ae60}
    .sidebar .label-size-4 a {background:#9b59b6;border-bottom:3px solid #74398E;}
    .sidebar .label-size-4 a:hover {background:#8e44ad}
    .sidebar .label-size-5 a {background:#e74c3c;border-bottom:3px solid #922C20;}
    .sidebar .label-size-5 a:hover {background:#c0392b}


    • After Adding Code Click On Save Template....
    • You're Almost Done..
    To Display Them In Cloud Mode Go To Labels In Layout And Select Cloud From The Options..
    Go To Your Blog And Check,if you are getting any single problem then feel free to mention it via comments,We will reply as soon as possible.


    Sunday, 23 March 2014

    How to make maximum profit from adsense

    Today I will share something very important to every bloggers out there. Let me be clear that even most people having their Adsense account cannot make the enough profit out of it. This is because, they haven't followed the certain rules and regulations or, they do not comply with the terms.
    The fact being that Google Adsense is the one and only best solution for the publishers. And that it shares the maximum revenue with its customer.
    Today i'll tell you few guidelines that will help you to make the maximum profit out of your Google Adsense.

    1. See where to put Adsense ads.

    Google has found there are places where ads are more effective, and places where they are less effective.
    • Ads that appear when you first arrive at your page (i.e., "above the fold" as they say in the newspaper world) tend to be more effective than those that are below the fold.
    • Ads on upper left tend to perform much better than ads on the lower right.
    • Ads directly above the primary content, and ads that appear at the bottom of the page and above the footer tend to perform very well.
    • Wider ads are generally more successful, as they are much easier to read.
    • Ads that display images or video perform very well.
    • Using colors that complement your website colors will make them more readable, and so more effective.
    2. Tune your advertisements. 

    While Google AdSense will auto-populate your page with what they feel are relevant ads, use their tools to provide tighter controls. Here are ways to check which part of your webpage is perfect for ad placement.
    1. Set up channels. Channels are like labels that let you group your ad units your way—by color, category, or pages. By setting up channels, you can get detailed reports on the performance of your ad units, and use that to your advantage. For example:
    • Use one style of ad on one group of pages, and another style on another group. Track and compare the performance of the two styles, and pick the best performer.
    • Compare performance on pages that focus on different things. For example, if your pages about gardening perform better than your pages on cooking, you might consider adding more to your gardening pages.
    • If you have separate domains, set up a channel to track each of them to see which is generating the most clicks.
    So, tuning your ads alone won't make your profit more. The other things you should are:

    3. Traffic

    First and foremost, in order to generate any kind of revenue from AdSense you must have people clicking on your ads. In order for this to happen, you need to have people on your site, reading your content! Whether you have a business website, or a personal blog, the rule is the same: Get the word out!
    • Heavily trafficked large sites can see over a million hits a day, whereas a blog might feel lucky if they have 100 or 200 visitors a day.
    • For every click you receive, you may earn from $.05 to $5. Yes, that's a broad range, over a month, that is between $1.50 and $150.00. Where in that range you can expect to frequent depends entirely on you, your site, and your promotion efforts.
    4. Content is king

    The quality of your content is a most important factor in understanding your earning potential. If your site provides rich, compelling content and a great user experience, you will have more interested users. And more users means more traffic, which means more click, and more cash.

    I would love to hear from you. Please Comment..


    Saturday, 22 March 2014

    Add Customized Contact Us Page


    Contact Us Page Is Very Essential For Every Blog,So Today  We Are Posting How to add customized Contact Us Page....

    Step 1 : 

    • First Create a Blank Page  And Name It as Contact Us
    • Now Switch To HTML Mode and Paste The Below Code 

    <div id="contact_wrap">
    <h3>Contact Us</h3>
    <form name="contact-form">
    <input id="ContactForm1_contact-form-nbtname" name="name" placeholder="Name" size="30" type="text" value="">
    <input id="ContactForm1_contact-form-nbtemail" name="email" placeholder="Email" size="30" type="text" value="">
    <textarea cols="25" id="ContactForm1_contact-form-email-nbtmessage" name="email-message" placeholder="Message" rows="5"></textarea>
    <input id="ContactForm1_contact-form-nbtreset" type='reset' value='Clear'/>
    <input id="ContactForm1_contact-form-nbtsubmit" type="button" value="Submit">
    <br>
    <div style="max-width: 222px; text-align: center; width: 100%;">
    <div id="ContactForm1_contact-form-nbterror-message">
    </div>
    <div id="ContactForm1_contact-form-nbtsuccess-message">
    </div>
    </div>
    </form>
    </div>
    And Save The Page

    Step 2 :  

    • Go To Blogger >> Template >> Backup Your Template
    • Click Edit HTML >> Search For ]]></b:skin> (Want help to find Click Here)
    • Now Paste The Following code Above/Before ]]></b:skin>

    #ContactForm1_contact-form-nbtname{
    width: 270px;
    height:auto;
    margin: 5px auto;
    padding: 10px 10px 10px 40px;
    background:#f6f6f6 url(https://blogger.googleusercontent.com/img/b/R29vZ2xl/AVvXsEhvrG5WF-uQOhn58gL1gza9GipNp-jsziJ5yYtTrBEl2V2mCnYYrUhGAPDmBsPyI-El9SjJxPysn4soqyDLElObZwFNuR47sDte9C3V93KWBdOkWaG1DWuMetRCHRqH7uMUGXMmBXwVp7k/s1600/user.png)no-repeat 10px center;
    color:#777;
    border:1px solid #ccc;
    -webkit-border-radius: 4px;
    -moz-border-radius: 4px;
    border-radius: 4px;
    -webkit-box-shadow: rgba(0, 0, 0, 0.247059) 0px 1px 3px inset, #f5f5f5 0px 1px 0px;
    box-shadow: rgba(0, 0, 0, 0.247059) 0px 1px 3px inset, #f5f5f5 0px 1px 0px;
    }
    #ContactForm1_contact-form-nbtemail{
    width: 270px;
    height:auto;
    margin: 5px auto;
    padding: 10px 10px 10px 40px;
    background: #f6f6f6 url(https://blogger.googleusercontent.com/img/b/R29vZ2xl/AVvXsEhJdrptt0zLDiDQEFe49EePafw50j6SCo_jvAnd2Jhebuetz30vhRf8yN1uE9ftBTF6zp5tKxoem6LWhtcI4J1EMUh0lqrMTfQEEgb1Sut1SbgjesEKyDDZ6hULoDEmw8YWDNtb5fQyQq0/s1600/pen.png)no-repeat 10px center;
    color:#777;
    border:1px solid #ccc;
    -webkit-border-radius: 4px;
    -moz-border-radius: 4px;
    border-radius: 4px;
    -webkit-box-shadow: rgba(0, 0, 0, 0.247059) 0px 1px 3px inset, #f5f5f5 0px 1px 0px;
    box-shadow: rgba(0, 0, 0, 0.247059) 0px 1px 3px inset, #f5f5f5 0px 1px 0px;
    }
    #ContactForm1_contact-form-email-nbtmessage{
    width: 270px;
    height: 150px;
    margin: 5px auto;
    padding: 10px 10px 10px 40px;
    font-family:Arial, sans-serif;
    background: #f6f6f6 url(https://blogger.googleusercontent.com/img/b/R29vZ2xl/AVvXsEgLygnLJZANWRyANRMs3ew_Vr-GNuf_GBdvBIkFe9oX_jnyh6sH4r8YQYDeLbtsgcoPe-oHxgqmss1Gh2m14BXYRhiMb9XTqRZ3Bgv880tVy2iSQxJML5cKLUxYee4vdjoep5hHq6VvWTM/s1600/msg2.png)no-repeat 10px 10px;
    color:#777;
    border:1px solid #ccc;
    -webkit-border-radius: 4px;
    -moz-border-radius: 4px;
    border-radius: 4px;
    -webkit-box-shadow: rgba(0, 0, 0, 0.247059) 0px 1px 3px inset, #f5f5f5 0px 1px 0px;
    box-shadow: rgba(0, 0, 0, 0.247059) 0px 1px 3px inset, #f5f5f5 0px 1px 0px;
    }#ContactForm1_contact-form-nbtreset {
    width: 95px;
    height: 30px;
    float: left;
    color: #FFF;
    padding: 0;
    cursor:pointer;
    margin: 25px 0 3px 0 0;
    background-color:#005a8a;
    border-radius:4px;
    text-shadow: 1px 0 0 #1f4962;
    -webkit-box-shadow: inset 0 0 35px rgba(0,0,0,0.3),0px 1px 5px #666;
    -moz-box-shadow: inset 0 0 35px rgba(0,0,0,0.3),0px 1px 5px #666;
    box-shadow: inset 0 0 35px rgba(0,0,0,0.3),0px 1px 5px #666;
    background-color: #3689b9;
    border:1px solid #194f6d;
    }
    #ContactForm1_contact-form-nbtreset:hover {
    background:#4c9bc9;
    }
    #ContactForm1_contact-form-nbtsubmit {
    width: 95px;
    height: 30px;
    float: right;
    color: #FFF;
    padding: 0;
    cursor:pointer;
    margin: 25px 0 3px 0 0;
    background-color:#005a8a;
    border-radius:4px;
    text-shadow: 1px 0 0 #1f4962;
    -webkit-box-shadow: inset 0 0 35px rgba(0,0,0,0.3),0px 1px 5px #666;
    -moz-box-shadow: inset 0 0 35px rgba(0,0,0,0.3),0px 1px 5px #666;
    box-shadow: inset 0 0 35px rgba(0,0,0,0.3),0px 1px 5px #666;
    background-color: #3689b9;
    border:1px solid #194f6d;
    }
    #ContactForm1_contact-form-nbtsubmit:hover {
    background:#4c9bc9;
    }
    #ContactForm1_contact-form-nbterror-message, #ContactForm1_contact-form-nbtsuccess-message{
    width: 320px;
    margin-top:35px;
    }
    You're Almost Done..Now Visit Your Contact Us Page And See The Miracle But Messages Cannot Be Sent.To Rectify This Follow step 3

    Step 3 :  

    This is The Final Step Do It Carefully
    • Log In to your Blogger Account
    • Go To Layout Tab And Select Add a Widget
    • Now Select Contact Form from More Gadgets and Save
    Now Your Contact Form Will Work...But You Can See Contact Form in Sidebar,To Disable Contact Form In Side bar
    • Go To Blogger >> Template >> Backup Your Template
    • Click Edit HTML >> Search For </head>(Want help to find Click Here)
    • Now Paste The Following code Above/Before </head>
    <b:if cond='data:blog.pageType == &quot;static_page&quot;'>
    <style>
    #ContactForm1{ display:none!important;}
    </style>
    </b:if>

    •  Save The Template.Now You'r Done

    Go To Your Blog And Check,if you are getting any single problem then feel free to mention it via comments,We will reply as soon as possible.


    Customize Blogger Blockquote & Highlight codes with it


    Many Of The Bloggers Don't Know How To Highlight html Codes I There Blogs.So Today We are Going To Post How To Highlight Html Codes by Using Simple BlockQuote Trick

    (Do You Don't Know How To Use Blockquote Click Here)

    Step 1 :  Find The Blockquote In Template


    • Go To Blogger >> Template >> Backup Your Template
    • Click Edit HTML >> Search For .post blockquote (Want help to find Click Here)
    You Will Find A Code Similar To This..
    .post blockquote{
    --------------------
    --------------------
    }
    .post blockquote p{
    ---------------------
    ---------------------
    }
    .post blockquote:hover {
    ---------------------------
    -------------------------
    }

    Step 2 : Then Replace the Above Codes Given Below in Step 4

    Step 3 : If You Don't Find The Code Then Simply Follow Below Steps


    • Go To Blogger >> Template >> Backup Your Template
    • Click Edit HTML >> Search For ]]></b:skin> (Want help to find Click Here)
    • Now Paste The Following code Above/Before ]]></b:skin>
    Step 4 :
    .post blockquote {
    background: hsla(0, 4%, 95%, 0.34) url(https://blogger.googleusercontent.com/img/b/R29vZ2xl/AVvXsEhJAbwOJNDqQtgLQ-qVM7O2GQhP-DYgvA0DLRlSkzqMtP4jGQsDCI8E0_4bJS-BWfUv8xA9KLNAn_N1ipbkc71oHxDk7_ZbTsDNkCJJ-a_3gUmwiTP0eur_fjz7YMtbthwhMPwQMs2tFYo/s1600/blockquote.png) no-repeat bottom center;
    margin: 20px;
    padding: 10px 20px 40px 20px;
    border: 1px solid #ddd;
    font-size: 0.9em;
    word-wrap: break-word;
    overflow: hidden;
    -webkit-box-shadow: 0 0 5px 5px hsla(0, 0%, 50%, 0.13);
    -moz-box-shadow: 0 0 5px 5px hsla(0, 0%, 50%, 0.13);
    box-shadow: 0 0 5px 5px hsla(0, 0%, 50%, 0.13);
    }
    .post blockquote p {
    margin: 0;
    padding: 0 0 15px;
    }
    .post-body blockquote {
    line-height: 1.3em;
    }

    Customization  : 

    • Replace https://blogger.googleusercontent.com/img/b/R29vZ2xl/AVvXsEhJAbwOJNDqQtgLQ-qVM7O2GQhP-DYgvA0DLRlSkzqMtP4jGQsDCI8E0_4bJS-BWfUv8xA9KLNAn_N1ipbkc71oHxDk7_ZbTsDNkCJJ-a_3gUmwiTP0eur_fjz7YMtbthwhMPwQMs2tFYo/s1600/blockquote.png With Your Image.
    • Now Save The Template
    • Go To Your Blog And Check,if  you are getting any single problem then feel free to mention it via comments,We will reply as soon as possible. 


    Add Facebook Popup Like Box To Blogger Using Jquery

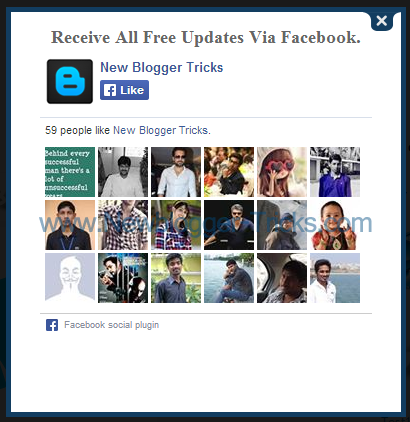
    The popup Like box is not designed for make you blog look like professionals, The widget designed for get more Facebook like. This box has also a close botton at the top right corner. Visitor can close this widget by clicking on close button.


    when reader visit your blog first timeFacebook like box is appear to your reader and when visitor navigate to another page or visit back later like box never appear again if readers doesn’t there browser cookies.


    How To Install This To Blogger

    You can Install This Widget Easily in your Blog By Following These Simple Steps....

    Before you edit any template it's better to keep a Backup..So First Backup your Template.

    1. Go to your Blogger Dashboard>>Template>>Edit Html

    2. Find following code in your template.
    </head>
    3. and paste the following code before/above </head>
    <script src='https://ajax.googleapis.com/ajax/libs/jquery/1.6.1/jquery.min.js'></script><script src='http://yourjavascript.com/69231961363/jquery-colorbox-min.js' type='text/javascript'/> <script type='text/javascript'> jQuery(document).ready(function(){ if (document.cookie.indexOf(&#39;visited=true&#39;) == -1) { var setDays = 1000*60*60*24*7; var expires = new Date((new Date()).valueOf() + setDays); document.cookie = &quot;visited=true;expires=&quot; + expires.toUTCString(); $.colorbox({width:&quot;400px&quot;, height:&quot;430px&quot;, inline:true, href:&quot;#facebook-popup&quot;}); }});</script>

    4. Now Search for
     </b:skin>
    5. and paste following css code before/above </b:skin>


    /* Facebook Popup Like Box */ #colorbox, #cboxOverlay, #cboxWrapper { position: absolute; top: 0; left: 0; z-index: 9999; overflow: hidden; } #cboxOverlay { position: fixed; width: 100%; height: 100%; } #cboxMiddleLeft, #cboxBottomLeft { clear: left; } #cboxContent { position: relative; } #cboxLoadedContent { overflow: auto; -webkit-overflow-scrolling: touch; } #cboxTitle { margin: 0; } #cboxLoadingOverlay, #cboxLoadingGraphic { position: absolute; top: 0; left: 0; width: 100%; height: 100%; } #cboxPrevious, #cboxNext, #cboxClose, #cboxSlideshow { cursor: pointer; } .cboxPhoto { float: left; margin: auto; border: 0; display: block; max-width: none; -ms-interpolation-mode: bicubic; } .cboxIframe { width: 100%; height: 100%; display: block; border: 0; } #colorbox, #cboxContent, #cboxLoadedContent { box-sizing: content-box; -moz-box-sizing: content-box; -webkit-box-sizing: content-box; } /* User Style: Change the following styles to modify the appearance of Colorbox. They are ordered and tabbed in a way that represents the nesting of the generated HTML. */ #cboxOverlay { background: #000; } #colorbox { outline: 0; } #cboxContent { margin-top: 20px; background: #000; } .cboxIframe { background: #fff; } #cboxError { padding: 50px; border: 1px solid #ccc; } #cboxLoadedContent { border: 5px solid #123D60; background: #fff; box-shadow: 3px 3px 3px #fff; } #cboxTitle { position: absolute; top: -20px; left: 0; color: #ccc; } #cboxCurrent { position: absolute; top: -20px; right: 0px; color: #ccc; } #cboxLoadingGraphic { background: url(https://blogger.googleusercontent.com/img/b/R29vZ2xl/AVvXsEh_6towZbFWBi4CJE88RQ-4dKe5x9BHjC46E_zOz06tF_JNcw2SpHMb_UvFufbwx38BKHeNPMnROpic8Ru5ci45kjk7HLppVQ7BugzximBvrF2gSaUmoRWr5pYuWFjQSnViott0yTDEMAfS/s32/loading.gif) no-repeat center center; } /* these elements are buttons, and may need to have additional styles reset to avoid unwanted base styles */ #cboxPrevious, #cboxNext, #cboxSlideshow, #cboxClose { border: 0; padding: 0; margin: 0; overflow: visible; width: auto; background: none; } /* avoid outlines on :active (mouseclick), but preserve outlines on :focus (tabbed navigating) */ #cboxPrevious:active, #cboxNext:active, #cboxSlideshow:active, #cboxClose:active { outline: none; } #cboxSlideshow { position: absolute; top: -20px; right: 90px; color: #fff; } #cboxPrevious { position: absolute; top: 50%; left: 5px; margin-top: -32px; background: url(https://sites.google.com/site/techprevue/home/controls.png) no-repeat top left; width: 28px; height: 65px; text-indent: -9999px; } #cboxPrevious:hover { background-position: bottom left; } #cboxNext { position: absolute; top: 50%; right: 5px; margin-top: -32px; background: url(https://sites.google.com/site/techprevue/home/controls.png) no-repeat top right; width: 28px; height: 65px; text-indent: -9999px; } #cboxNext:hover { background-position: bottom right; } #cboxClose { position: absolute; top: 5px; right: 5px; display: block; background: url(https://blogger.googleusercontent.com/img/b/R29vZ2xl/AVvXsEh1uFHpFqNQTspnnrdCJtiNo951wkawtxlKRTNxmPcO2B2W5IlPAK1oCtbt1Y23z0LPXFv2E5sdFq_inpudZC-OEeZyJH3Z5RdJOXf-Ufn56tpvTdBoJ_4XvMFdkfMlpdWdK3XRsgLUzjGU/s130/controls.png) no-repeat top center; width: 38px; height: 19px; text-indent: -9999px; } #cboxClose:hover { background-position: bottom center; }
    6. Save your template and you are done second last step! Visit your blog to see it working just perfectly.
    7. Now finally find following code.

    </body>
    8. and paste the following code before closing </body> tag.


    <div style='display:none'> <div id='facebook-popup' style='background:#fff;position:scroll;z-index:99999;'> <div style='text-align:center;padding-top:15px'> <h3 style='font-family: &apos;Source Sans Pro&apos;, Sans Serif; Font-size: 18px; font-weight: 300px; '>Receive All Free Updates Via Facebook.</h3> <iframe allowtransparency='true' frameborder='0' scrolling='no' src='//www.facebook.com/plugins/likebox.php?href=http%3A%2F%2Fwww.facebook.com%2Fnewbloggertricks&amp;width=342&amp;height=300&amp;show_faces=true&amp;colorscheme=light&amp;stream=false&amp;show_border=false&amp;header=false&amp;appId=' style='border:none; overflow:hidden; width:342px; height:300px;'/> </div> </div> </div>

    Replace newbloggertricks with your facebook fan page username.

    save your template and you are all done. .!!
    Visit your blogs and see it popping up just fine! Remember that the popup will show only once. To see it again you will first need to delete your browser cookie and then refresh the page to see it appearing again.

    I just hope you would find this tutorial easy and yet exciting. Please let me know if you need any help. I just hope you can make your strong facebook fan growth. Wish you success and peace buddies. Stay updated by subscribing our email news feed or like our facebook page.

    Customization :

    In The First Code
    • *7 Setting this value will effect cookie refreshment If It 7 then it appear for every  7 days. If you want to display like box to your visitors after a 1 day then set 7 to 1. if you set the value to 1 then it can annoying your regular readers.


    Wednesday, 11 December 2013

    Add ADMIN Ribbon In Blogger Comments


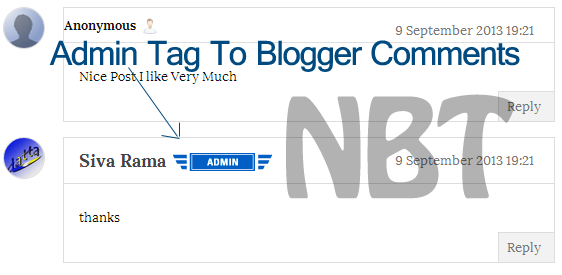
    Blogger commenting system has perpetually been versatile and provides the power to their users to customize it their own method these days one in all our readers asked that however am i able to add ADMIN Ribbon Or Icon With The Admin Comments in Blogger. therefore these days this can be special requested tutorial that we tend to square measure progressing to share to point out however simply you'll be able to implement this feature in Blogger Commenting System.

    How To Add ADMIN Ribbon Or Icon With Comments In Blogger?

    So let’s start with the tutorial:

    1. Log-in to your Blogger Dashboard.
    2. Go to Template > Backup.
    3. Now click “Edit HTML.”
    4. Inside the “HTML EDITOR”, Press CTRL+F and search for </b:skin> tag. Click ► to expand the code.


    5. Then search for “COMMENTS” styles between </b:skin> and ]]></b:skin> tags.
    6. You will find the code similar to this:1
    #comments .comment-author{
    padding-top: 1.5em;
    border-top: 1px solid $(body.rule.color);
    background-position: 0 1.5em;}
    #comments .comment-author:first-child{
    padding-top: 0;
    border-top: none;}
    .comments .comment-content{ padding:5px 0;}
    .avatar-image-container{
    margin: .2em 0 0;}
    #comments .avatar-image-container img{
    border: 1px solid $(image.border.color);}
    .comment-actions a
    {
    font-size:11px; color:#777 !important
    }
    .comments .comments-content .user
    {
    font-size:16px; color:#000;
    }
    .comments .comments-content .datetime
    {
    font-size:11px; color:#777 !important
    }
    .comments .comments-content .datetime a
    {
    color:#777;
    }
    .comments .comments-content .comment-thread ol a
    {

    color:#000;}
    .comments .comments-content .loadmore a{
    border-top: 1px solid $(widget.alternate.text.color);
    border-bottom: 1px solid $(widget.alternate.text.color);
    }
    .comments .comment-block
    {
    border: 1px solid #ddd;
    padding: 7px;
    }
    .comments .comment-thread.inline-thread{
    background-color: $(post.footer.background.color);
    }
    .comments .continue a
    {
    background:#f9f9f9;width:130px;border:1px solid #ddd;border-radius:9px;
    padding: 10px;color:#000;
    }
    .comments .continue{
    border-top: 2px solid $(widget.alternate.text.color);
    }
    .comments h4{
    font: $(post.title.font);
    margin: .75em 0 0;
    padding: 10px;
    border: 1px solid #ddd;
    width: 100px;
    }
    .comment-form
    {
    width:90%;
    max-width:90%
    }


    7. Now copy & paste the following code, just below the Yellow Highlighted Code above.

    .comments .comments-content .icon.blog-author
    {
    background-repeat: no-repeat;
    background-image: url (Your Ribbon Or Icon Image Link Goes Here);
    height:38px;
    width:38px;
    margin:0;
    position:absolute;
    right:0px;
    top:-0px;}

    8. Click “SAVE TEMPLATE”.

    You are all done. Refresh your blog to see the ADMIN RIBBON OR ICON with the comments.

    Customization:

    1. Replace “Your Ribbon Or Icon Image Link Goes Here” with your own Ribbon Or ICON image URLwhich you have hosted at blogger or other hosting services.
    2. Adjust the width, height according to your own choice. 

    One Of The Admin Tag
    https://blogger.googleusercontent.com/img/b/R29vZ2xl/AVvXsEj_gK4acL7qjDRHhsdxl3aIhKfbiZg3Q3fO7IZEICY3M_F7hBvpanTdyL_fCQ8Pk0qLl14sgAzls00-6jqiGAWDovtM05-32IUVxCUaTq2hEAs4RXA9T_xzvEcgqGnBmQ1gEDSx1uNxexj9/s1600/admin.png 

    That’s All.
    Happy Blogging. 

    Got Questions?

    Don’t forget to spread this knowledge with your friends and subscribe at our blog for more updates. If you need any questions, please feel free to ask by leaving your comments below and we will try our best to answer and will be great honor for us. Peace, blessings & cheers.! :)


    Friday, 11 October 2013

    Add SOCIALIZE IT Bar Below Post Title In Blogger Blog

    Social Buttons Plays a Crucial Role In Generating traffic From Social Sites..So Add These Buttons Under Post Title Will Increases Traffic

    Adding SOCIALIZE IT Below Post Title In Blogger

    Implementing this new horizontal social bookmarking button bar below post title in blogger is not a difficult task..Follow The Below Steps To Add Them Easily
    • Go To Blogger >> Template >> Backup Your Template
    • Click Edit HTML and Find For </head>  (Want help to find code Click Here)
    • Just Above </head> Paste The Following Code.
    <style type='text/css'>
    /*<![CDATA[*/
        .horizontalsocial .sharertitle{float: left; border-right: 1px solid #d2d2d2; padding: 3px 10px 2px 0px; margin: 0 0px 0 0; color: #b1a9a5; font-family:'Oswald', Arial, Helvetica, sans-serif;text-transform: uppercase; line-height: 25px; vertical-align: middle;  font-size: 14px;}
        .horizontalsocial .fb-like{width: 100px; float: left; border-right: 1px solid #d2d2d2; padding: 3px 0 2px;  height: 25px; }
        .horizontalsocial .sharertwitter{float: left; width: 115px; border-right: 1px solid #d2d2d2; margin: 0 15px 0 0; padding: 3px 0 2px; height: 25px;}
        .horizontalsocial .sharergplus{float: left; width: 90px; margin: 0 15px 0 15px; padding: 3px 0 2px; border-right: 1px solid #d2d2d2; height: 25px;}
        .horizontalsocial .sharerbubble{background: url(https://blogger.googleusercontent.com/img/b/R29vZ2xl/AVvXsEirlBRRJtw8m9quEQfKIctrCU9YfQFsFdT0bGJJ-bp2qjHAvLmMEFrnlFbAu31kCjoIsemgpFR1OPKF1ozXs82HWuE5fTuRrDpXxjNH9HmuI6gjZchY8BJ3BpN7wbZLT0ZCnB56jP3K4UE/s1600/Commentz.png) no-repeat;  height: 25px; min-width: 25px; float: left; margin: 7px 0 0; line-height: 18px; vertical-align: top;}
        .horizontalsocial .sharerbubble a{color: #2d2520;  padding: 0px 0 0px 30px; font-size: 18px !important; font-family: 'Lora', Arial, Helvetica, san-serif !important; }
        .horizontalsocial.fixed{ position:fixed; top: -2px; z-index: 99999;}
        #nbtsocialshare {clear:both;padding: 6px 0;display:block;background:#FFFFFF;}
        #nbtsocialshare td{padding:4px;margin:0;border:none;}
        #nbtsocialshare td iframe{max-width:82px;width:82px !important;}
        #nbtsocialshare.nbtFloatSocial{position: fixed;top:0;z-index:9999999;border-bottom:1px solid #ccc;-webkit-box-shadow:0 1px 1px rgba(0,0,0,0.15);-moz-box-shadow:0 1px 1px rgba(0,0,0,0.15);box-shadow:0 1px 1px rgba(0,0,0,0.15);}
    /*]]>*/
    </style>
    <script type='text/javascript'>
    /*<![CDATA[*/
    // Set the Top Offset
    $theOffset = 0;
    jQuery(document).ready(function(b){var a=b("#nbtsocialshare");a.wrap('<div id="nbtSocialPlaceholder"></div>').closest("#nbtSocialPlaceholder").height(a.outerHeight());a.width(a.outerWidth());e=a.offset().top-$theOffset;b("#nbtsocialshare iframe[src*=plusone]").closest("div").css("max-width","82px");b(window).scroll(function(){d=b(this).scrollTop();d>=e?a.addClass("nbtFloatSocial"):a.removeClass("nbtFloatSocial");f=b(".post");if(f.length!=0){c=f.outerHeight()+f.offset().top;d>=c?a.stop().animate({top:"-150px"}):a.stop().animate({top:$theOffset+"px"})}else d>=e?a.css("top",$theOffset+"px"):a.css("top","0")})});
    /*]]>*/
    </script>
    <script type='text/javascript'>
    /*<![CDATA[*/
    // Twitter
    (function(a,b,c){var d=a.getElementsByTagName(b)[0];if(!a.getElementById(c)){a=a.createElement(b);a.id=c;a.src="//platform.twitter.com/widgets.js";d.parentNode.insertBefore(a,d)}})(document,"script","twitter-wjs");
    // Google + (plus)
    (function(){var a=document.createElement("script");a.type="text/javascript";a.async=true;a.src="https://apis.google.com/js/plusone.js";var b=document.getElementsByTagName("script")[0];b.parentNode.insertBefore(a,b)})();

    /*]]>*/
    </script>

    • Now  Find For <div class='post-body entry-content'>
    • And Just Above/Before It Add The Following Code...
    <b:if cond='data:blog.pageType == &quot;item&quot;'>
    <div class='horizontalsocial social-buttons' id='horizontalsocial'>
    <div class='nbtsocialshare' id='nbtsocialshare'>
    <table class='nbtsocialshare' width='100%'>
        <tr>
    <td><div class='sharertitle'>Socialize It &#8594;</div>
    </td>
            <td>
                <div class='sharertwitter'><a class='twitter-share-button' expr:data-text='data:post.title' expr:data-url='data:post.url' href='https://twitter.com/share'>Tweet</a></div>
            </td>
            <td>
            <div class='fb-like'>    <iframe allowTransparency='true' expr:src='&quot;//www.facebook.com/plugins/like.php?href=&quot; + data:post.url + &quot;&amp;send=false&amp;layout=button_count&amp;width=80&amp;show_faces=false&amp;action=like&amp;colorscheme=light&amp;font&amp;height=21&quot;' frameborder='0' scrolling='no' style='border:none; overflow:hidden; width:80px; height:21px;'/></div>
            </td>
         
            <td>
            <div class='sharergplus'>    <div class='g-plusone' data-size='medium' expr:data-href='data:post.url'/></div>
            </td>
         
            <td>
    <div class='sharerbubble'><span class='thecomments'>
    <b:if cond='data:post.allowComments'>
    <a class='comment-link' expr:href='data:post.addCommentUrl' expr:onclick='data:post.addCommentOnclick'><b:if cond='data:post.numComments == 1'>1 <b:else/><data:post.numComments/> </b:if></a>
    </b:if>
    </span></div>
    </td>
        </tr>
    </table>
    </div></div>
    </b:if>


    • Click Save Template and You're  Done!
    • Go To Your Blog And Check It Below Post Title
    • If  you are getting any single problem then feel free to mention it via comments,I will reply as soon as possible.
    Update :
    Make This Bar Floating By Following Below Step

    On The Second Code  Replace 
    <div class="horizontalsocial social-buttons" id="horizontalsocial">
    With
    <div class="horizontalsocial social-buttons" id="horizontalsocial"style="position: fixed;">


    Saturday, 28 September 2013

    Add Custom Page Link In Address Bar Of Blogger Blog

    Are You Created New Page  ?
    In address Bar It Is Showing   as /p/blog-page.html Instead Of Original Name ??
    Change The Link Of Any Page Easily As You Like By Following 
    • First Go To pages Tab on Blogger
    • Click On New Page >> Blank Page and Enter The Page Title As You Like
    • Now Click On Publish Without Writing Any Thing On That Page
    • Now Check The Page Link It Will Definitely The Name You Entered
    • Now Edit The Page And Write On That Page.
    If You Want To Share This On Your Blog Give A Link Back to Our Site

    This Is A Simple Blogger Trick,if still you are getting any single problem then feel free to mention it via comments,We will reply as soon as possible.


    Friday, 27 September 2013

    Beautiful Page Navigation for Blogger Blog

    Blogger Page Navigation is an awesome trick to navigate your Blogger Blog Pages.By using this In your blog visitors can easily go to an appropriate page.By default Blogger allows Older Posts and Newer Posts link to Navigate between Blog pages.It is very difficult for your users to navigate deeper into your Blog's Posts, so the Page Navigation helps us to solve this problem.


    So add This To Your Blog By Following Simple Steps Below
    • Log In to your Blogger Account
    • Go To Layout Tab And Select Add a Widget
    • Then select HTML/JavaScript And Paste The Below Code Inside It
    <style type='text/css'>#blog-pager{height: 28px;    padding: 10px 0 0;overflow:hidden;text-align:center;}.showpageArea a {text-decoration:underline;font-size: 16px;       text-align: center;}.showpageNum a {font-size:16px;text-decoration:none;border: 1px solid #cccccc;margin:0 5px;padding:5px;}.showpageNum a:hover {border: 1px solid #cccccc;background-color:#cccccc;}
    .showpagePoint {font-size:16px;text-decoration:none;border: 1px solid #cccccc;background: #216FD9;margin:0 5px;padding:5px;color:#ffffff;}
    .showpageOf {text-decoration:none;padding:5px;margin: 0 5px;}.showpage a {text-decoration:none;border: 1px solid #cccccc;padding:5px;}.showpage a:hover {text-decoration:none;background: #cccccc;}.showpageNum a:link,.showpage a:link {text-decoration:none;color:#333333;}</style><script style='text/javascript'>var pageCount=7; var displayPageNum=5;var upPageWord="Previous";var downPageWord="Next";</script><a href="http://www.newblogger-tricks.com" style="font-size:0pt">Nbt Widgets</a><script style='text/javascript' src='http://newbloggertricks.googlecode.com/svn/newbloggertricks-page-nav-v2.js'></script>

    Customization :

     If You Want To Change The No.Of Posts Appear per page

    • Change pageCount=
    • Go to Settings >> Posts and Comments and Change as Show In Fig
    Finally save your Widget and visit your Blog You Will Find The Page Navigation At The end Of Page.We have kept the installation one step installation,if still you are getting any single problem then feel free to mention it via comments,We will reply as soon as possible.


    Add Email Subscription Widget With Social Media Below Blogger Posts v.3

    This widget will surely increase number of your social subscribers.If you are writing good posts and expecting more number of subscribers then this widget will surely help you.It contains an email subscription form,facebook like button,twitter follow button and some beautiful social icons at the right of the widget.This widget can be installed in one step,you just have to copy and paste code in your template.Now lets see how to add it into blogger blog?

    Subscription Widget With Social Media Widget Generator

    • In Customize Field Enter The All The User Names In Corresponding Boxes
    • Click on Generate Button 
    • You Can Watch Demo (In New Tab) By Clicking on Demo
    • Copy The Generated Code And Follow Below Steps

    Copy The Generated Code And Follow below Steps
    • First go to Blogger Dashboard > Template
    • Download a copy of your template
    • Click on Edit HTML
    • Find below code in your template (Want help to find code Click Here)
    <data:post.body/>

    • If You Find Three <data:post.body/> Then Add The Code After or Below 2nd One 

    Finally save your template and visit your any post you will watch this widget after posts ends.I have kept the installation one step installation,if still you are getting any single problem then feel free to mention it via comments,I will reply as soon as possible.

    Direct Mode :

    How To Add Email Subscription Form To Blogger?
    • First go to Blogger Dashboard > Template 
    • Download a copy of your template 
    • Click on Edit HTML 
    • Find below code in your template (Want help to find code Click Here)
    <data:post.body/>

    Add below piece of code just after/below of above code,If You Find 3 <data:post.body/> Then Add Below Code After 2nd One
    <b:if cond='data:blog.pageType == "item"'>  <style type="text/css">  form.feedburner {    margin: 20px 0 0;    display: block;    clear: both;  }  .TechnoFusionstyle {    background: url(https://blogger.googleusercontent.com/img/b/R29vZ2xl/AVvXsEjWv6F7RNAi4H2jxzyD6p0dCiBPVmk_8jMCIh_ugZi5_ztA-kXNksMGgeYNhfKzeMXEp5lYPlnpQl3-3fQe6xUgjs4cR3WUYVuvqEMLbY1e6d1o5lHum7_8XiQtQZSRIGA8f4Iru5w8Bjnw/s1600/TechnoFusion.info-email-icon.png) no-repeat scroll 4px center transparent;    padding: 7px 15px 7px 35px;    color: #666;    font-weight: bold;    text-decoration: none;    border: 1px solid #D3D3D3;    -moz-border-radius: 4px;    -webkit-border-radius: 4px;    border-radius: 4px;    -moz-box-shadow: 1px 1px 2px #CCC inset;    -webkit-box-shadow: 1px 1px 2px #CCC inset;    box-shadow: 1px 1px 2px #CCC inset;  }  .technofusionsubmit {    color: #666;    font-weight: bold;    text-decoration: none;    padding: 6px 15px;    border: 1px solid #D3D3D3;    cursor: pointer;    -moz-border-radius: 4px;    -webkit-border-radius: 4px;    -goog-ms-border-radius: 4px;    border-radius: 4px;    background: #fbfbfb;    background: -moz-linear-gradient(top, #fbfbfb 0%, #f4f4f4 100%);    background: -webkit-gradient(linear, left top, left bottom, color-stop(0%, #fbfbfb), color-stop(100%, #f4f4f4));    background: -webkit-linear-gradient(top, #fbfbfb 0%, #f4f4f4 100%);    background: -o-linear-gradient(top, #fbfbfb 0%, #f4f4f4 100%);    background: -ms-linear-gradient(top, #fbfbfb 0%, #f4f4f4 100%);    filter: progid:DXImageTransform.Microsoft.gradient(startColorstr=&#39;    #FBFBFB&#39;    , endColorstr=&#39;    #F4F4F4&#39;    , GradientType=0);    background: linear-gradient(top, #fbfbfb 0%, #f4f4f4 100%);  }  #TechnoFusion-widget {    -moz-border-radius: 10px 10px 10px 10px;    -webkit-border-radius: 10px 10px 10px 10px;    -goog-ms-border-radius: 10px 10px 10px 10px;    border-radius: 10px;    background: none repeat scroll 0 0 transparent;    border: 1px solid #D3D3D3;    padding: 8px;    -moz-transition: all 0.3s ease-out;    -o-transition: all 0.3s ease-out;    -webkit-transition: all 0.3s ease-out;    -ms-transition: all 0.3s ease-out;    transition: all 0.3s ease-out;    width: 480px;    -webkit-box-shadow: inset 0px 0px 8px rgba(50, 50, 50, 0.75);    -moz-box-shadow: inset 0px 0px 8px rgba(50, 50, 50, 0.75);    box-shadow: inset 0px 0px 8px rgba(50, 50, 50, 0.75);    -webkit-box-shadow: inset 0px 5px 0px 0px #D8D8D;  }  #TechnoFusion-widget:hover {    background: none repeat scroll 0 0 #FFF;    -moz-box-shadow: 1px 1px 2px #CCC inset;    -webkit-box-shadow: 1px 1px 2px #CCC inset;    box-shadow: 1px 1px 2px #CCC inset;  }  #TechnoFusion-widget td {    padding: 3px 0;  }  </style>  <center>    <br/>    <div id='TechnoFusion-widget'>      <div id='emailwidget'>        <table style='border:none; margin: 0px 0px 0px 0px; padding: 0px 0px 0px 0px;' width='100%'>          <tbody>            <tr style='border:none; margin: 0px 0px 0px 0px; padding: 0px 0px 0px 0px;'>              <td align='left' style='border:none; margin: 0px 0px 0px 0px; padding: 0px 0px 0px 0px;'>                <p style='color:#666; font-weight: bold; font-size: 18px; margin:0px 0px 5px 0px;font-family:georgia;font-style:italic; '>Get free daily email updates!                </p>                <form action='http://feedburner.google.com/fb/a/mailverify' class='feedburner' method='post' onsubmit='window.open(&apos;http://feedburner.google.com/fb/a/mailverify?uri=ablod&apos;, &apos;popupwindow&apos;, &apos;scrollbars=yes,width=550,height=520&apos;);return true'                style='margin: 0pt;' target='popupwindow'>                  <input name='uri' type='hidden' value='newblogger-tricks' />                  <input name='loc' type='hidden' value='en_US' />                  <input class='TechnoFusionstyle' name='email' onblur='if (this.value == &quot;&quot;) {this.value = &quot;Enter your email…&quot;;}' onfocus='if (this.value == &quot;Enter your email…&quot;) {this.value = &quot;&quot;}'                  type='text' value='Enter your email…' />                  <input alt='' class='technofusionsubmit' title='' type='submit' value='Submit' />                </form>              </td>              <td style='border:none; margin: 0px 0px 0px 0px; padding: 0px 0px 0px 0px;'>                <p style='color:#666; font-weight: bold; font-size: 14px; margin:0px 0px 5px 0px;font-family: georgia; '>Follow us!                </p>                <a href='http://feeds.feedburner.com/newblogger-tricks' rel='nofollow' target='_blank' title='Suscribe to RSS Feed'>                  <img src='https://blogger.googleusercontent.com/img/b/R29vZ2xl/AVvXsEje4jgIY6xQNiV6N4KY55ye3D2ZpLJ0CdcGyYuV2Dz_Up9HJcPJ4u-3owU8vGMtfckq38c91o9L_mmW4f0i3cm2RitHgFaMCj4-5tdiz28AiFOHkPfZzr5S6iwiUE7x0l6ZDIa96Z8iXFwy/s1600/TechnoFusion.info-rss.png' />                </a>                <a href='http://twitter.com/newbloggertrix' rel='nofollow' target='_blank' title='Follow us on Twitter'>                  <img src='https://blogger.googleusercontent.com/img/b/R29vZ2xl/AVvXsEjlESdDSLr3gHTJjlpVDMkf5J8x098vIMMfqbkhkQJZ-201ogHf96W3Pnba7dg3nDIJO-goYLYeaQlU5awlQVuTb_C6lzfwAoaUt6PIXnDFuqK0h4EdjRgstZyWjRT-hlV8P4p76_5pIz5H/s1600/TechnoFusion.info-twitter.png' />                </a>                <a href='http://www.facebook.com/newbloggertricks' rel='nofollow' target='_blank' title='Follow us on Facebook'>                  <img src='https://blogger.googleusercontent.com/img/b/R29vZ2xl/AVvXsEjuZ2EQn_juHdnYdLPjucx1QwfMtdWTBDXj-uFbhfia7H4SEhXK4xnClJtvtAMzchgy5FGajR3ly1woQnKpFlG5G1BpP4PBBzQlKViAURps18SjZ0cmHBrITscNkrzNPxgR03WMiL2yp18Z/s1600/TechnoFusion.infoTechnoFusion.info-fb.png' />                </a>                <a href='https://plus.google.com/116453328301201221048/' rel='nofollow' target='_blank' title='Follow us on Google+'>                  <img src='https://blogger.googleusercontent.com/img/b/R29vZ2xl/AVvXsEg5uMNkfxVhyphenhyphenVvIAMw9-OUdGP21ndoGhkAsBjmNQPGce_Y3SVvsU-NXuXvXMa7IU7WftX-_-TXVxm-7wu-70BQkep_sOF9NtL92Z8qxJrNfU2n2BRgTMlztS1X4xUg_v4CJ9rPCvQEZ2hQh/s1600/TechnoFusion.info-gplus.png' />                </a>              </td>            </tr>          </tbody>        </table>        <div align='right'>          <span style='font-style: italic; font-size: 8px; color: solid #ffffff;'> <a href='http://newblogger-tricks.blogspot.in/2013/09/add-email-subscription-widget-below.html'style='text-decoration: none;'target='_blank'><font color='#000' decoration='none'>[Get this widget] </font></a></span></div><iframe src="//www.facebook.com/plugins/like.php?href=http%3A%2F%2Fwww.facebook.com%2Fnewbloggertricks&amp;send=false&amp;layout=standard&amp;width=450&amp;show_faces=true&amp;action=like&amp;colorscheme=light&amp;font=verdana&amp;height=30"        scrolling="no" frameborder="0" style="border:none; overflow:hidden; width:450px; height:30px;" allowtransparency="true"></iframe>        <a class='twitter-follow-button' href='http://twitter.com/newbloggertrix' rel='nofollow'></a>        <script src='http://platform.twitter.com/widgets.js' type='text/javascript'></script>      </div></div></center></b:if>
    Replace all(three) newblogger-tricks with your Feedburner Username
    Replace all(two) newbloggertricks with your Facebook Username
    Replace all(two) newbloggertrix with your Twitter Username
    Replace 106527290580119996124 with your Google + ID


    Finally save your template and visit your any post you will watch this widget after posts ends.I have kept the installation one step installation,if still you are getting any single problem then feel free to mention it via comments,I will reply as soon as possible.


  • Home
  • About Us
  • Contact Us
  • Write For Us
  • Sitemap
  • Privacy Policy
  • Back To Top